Showing posts with label Dessert. Show all posts

Thursday, June 4, 2015

Easy Raspberry Jam Bars

So someone brought be a raspberry bar at work a year ago and I haven't stopped thinking about it since.  I'm still on the hunt to remake the exact recipe, but this came pretty close.  You guys know my baking abilities...they are limited.  So I went out on the world wide web and found this super easy peasy recipe.  What's awesome is that I keep most of these ingredients on hand and I bet you do too. 


I want to try this recipe with fresh raspberries, but making it with jam is SO easy.  And speaking of, you can really use whatever jam you have on hand.  Charlie thinks these tasted like "really awesome breakfast bars."  I must warn you they are more dessert than breakfast, but I don't hate the idea of bringing these to a brunch.  In fact, I kinda like it.  I kinda like it a lot. 


Ok.  So.  Start by mixing all of the dry ingredients - flour, baking soda, oats, and salt...


...and then add your room temp butter and incorporate with your hands. 


I doubled the recipe so it would work for a 9x13 pan.  I would recommend doing the same especially if you are bringing these for a crowd.  Press four cups of the mixture into the bottom of a foil lined pan.  Make sure to spray the foil with Pam otherwise these will be tricky for you to remove.


Spread the jam out over the base, but leave a boarder.  When the bars bake in the oven the jam will run and you don't want it seeping over the edges.  If that happens, the jam will burn and the outside will look fugly. 


Top the jam with the rest of the crumb mixture and press down gently with your hand.  Bake in a 350 degree oven for 35-45 minutes or until the top is golden brown.  DEAR GOD these smelled good. Guess what I'm making tomorrow?


Let them cool for as long as you can stand it.  I lasted a total of 30 minutes.  So you totally don't have to, but I'm obsessed with using a sieve to sprinkle powdered sugar on top.  I think it looks so pretty and official. 


These were delish and RIDICULOUSLY easy to make.  Now that I know how easy bars can be, I'm going to start making them more often.  Get excited.  This pregnant lady likes to bake (really really easy recipes) and has a serious sweet tooth.


Here's the recipe for Easy Raspberry Jam Bar Recipe (adapted from Allrecipes)

1 Cup Packed Light Brown Sugar 
2 Cups All Purpose Flour 
1/2 Tsp Baking Soda 
1/2 Tsp Kosher Salt 
2 Cups Rolled Oats 
1 Cup Butter  
1-1/2 Cups Good Quality Raspberry Jam 

Preheat oven to 350 degrees and line a 9x13 pan with foil that's been sprayed with Pam.  Combine all of the dry ingredients and mix thoroughly.  Add the butter (that's room temp) and incorporate using your hands until it's nice and crumbly and evenly distributed.  Press 4 Cups of the mixture onto the bottom of the pan.  Spread the jam out and leave a boarder.  Sprinkle the rest of the crumb mixture on top and press down with your hand.  Bake until golden brown, about 35-45 minutes.  Let cool, cut, and sprinkle with powdered sugar if you like.  

Stay hungry! 

Tuesday, April 21, 2015

Tart Cherry Lemon Bars

DESSERT.  My new favorite thing.  Crazy, I know, I know.  But ever since I got pregnant (SURPRISE) I'm obsessed with sweets.  It's bizarre really.  I am also obsessed with sour things - key lime pie for example.  Can't get enough of it.  Right around Easter I was craving (literally, this time) lemon bars.  I went a little rogue and added tart cherry juice concentrate to the recipe and it came out awesome.  I nearly ate the whole pan.  Oopsies. 


The crust is flakey and buttery and just balances so perfect with the tart, yet sweet filling.  I was a little scared of what would happen to the color when it baked, but it came out this pretty peach color.  Yay. 


I used this recipe for the lemon bars and then I added the tart cherry juice concentrate.  I began by making the filling, which is just flour, eggs, lemon juice, and sugar.  I made sure to strain the lemon juice so I didn't miss any seeds.  It can happen. 


These eggs were so fresh.  Nice and bright.  PS - look at my cool nail polish.  Obsessed.


The next step is where I demonstrate my inability to follow directions creativity.  My massage therapist recently told me about tart cherry juice.  It's the worlds most potent antioxidant and is a natural pain reliever.  Something that comes in handy when you have crazy pregnancy headaches.  The concentrate works awesome in smoothies, over yogurt, or even squirted into a dessert impulsively.  It's VERY tart - almost a combination of cherries and lemons.  I added two tablespoons.  Yummmyyyy.


The crust is super easy.  You just mix butter, flour, and a few pinches of sea salt (since I use unsalted butter) and then par bake it for 15-20 minutes in a 350 degree oven until it turns slightly golden brown.


Pour the filling on top, pray to the dessert gods that you measured everything right, and then pop it back in the oven for another 20 minutes until the filling sets.


Lemon bars come out sort of weird looking on top after they bake - the color comes out a little uneven so adding a dusting of powdered sugar is the way to go.  Make sure they cool completely, however, or else the powdered sugar will melt the second it hits the bars.


I am so sad these are gone.  I am dying to make more and now that I think of it, I have all of the ingredients.  I know what I'm having for lunch...:)

Here's the recipe, adapted from Allrecipes.com

Crust:
1 Cup of Butter, Softened
1/2 Cup of White Sugar
2 Cups of Flour

Filling:
4 Eggs
1-1/2 Cups of White Sugar
1/4 Cup of Flour
2 Lemons, Juiced
2 Tbs of Tart Cherry Juice Concentrate

Preheat oven to 350 degrees.  Blend all of the crust ingredients - it's easiest if you use your hands.  Press into the bottom of an ungreased 9x13 pan. Bake for 15 to 20 minutes in the preheated oven, or until firm and golden. In another bowl, mix all of the filling ingredients together and pour over par baked crust.  Bake for an additional 20 minutes.  Let them cool completely.  Dust with powdered sugar before serving and enjoy!

Stay hungry!


Monday, March 30, 2015

A Bulldozer Cake for Two Year Old Will

Well hello there!  It's been a while and a lot is new.  A lot like... I have a two year old!  These days Will is a happy little guy who loves his family, his frog blanket, splashing in puddles, and construction vehicles.  Especially construction vehicles.  So for his second birthday, we went all out with the construction theme.


We used Will's many trucks for decor and serving, but my favorite part of the theme was the bulldozer cake I made at 5:30 AM the morning of the party (what?  I woke up excited!).

Most of the bulldozer cakes I found on Pinterest were cakes shaped like bulldozers (I don't have the time or skill for that), so I cheated and used one of Will's toys (scrubbed down with Lysol wipes, then soap and hot water).  The cake itself is two layers of standard yellow cake frosted with chocolate frosting.  Once the base was done, it was time to add even more calories.


I coated the cake in crushed Oreos ("dirt") and then scattered some rocks (aka Snickers and Butterfinger bites).


I created a big pile of rocks for in front of the 'dozer out of Oreos, chocolate frosting, and candy chunks (Jaisa, avert your eyes if you're on one of those skinny recipe kicks).


Will was obsessed with the "bullzozer cake" and it was DELICIOUS.  Seriously, candy on Oreos on frosting on cake is the most delicious, decadent combination ever.

This was mostly a family party so we didn't have a ton of Will's little buddies around, but considering how well it went over with a bunch of grownups and older cousins, I feel confident saying that this would be a huge hit on the toddler party scene.

Aftermath:


After-aftermath (not pictured): me standing in front of the fridge tonight finishing off the last of this cake

Happy birthday to Willbo!  Here's to the terrible tasty twos!

Friday, May 2, 2014

Peanut Butter Chocolate Brownies

Holy sheet cake.  These were just ridiculous.  And oh, by the way, this recipe is not from scratch. 


My mom has been encouraging me to do some semi-homemade baking.  Now, don't get me wrong, from scratch is always best, but this is a good little cheat recipe if you don't have time or the patience (like me), but want to make something special. 

Ok.  So.  First, press down prepared cookie dough in your pan.  I used a 9x13, but I'd probably use a square pan next time.  If you do a 9x13 I would recommend doing two tubes of cookie dough (14 oz each). 


Next, lay down your peanut butter cups.  I did face down.  I didn't want them to see what was coming.


This next pic reminds me of college.


Ok.  So, get two boxes of your favorite brownie mix, prepare per the box's direction, and pour on top. I love Ghirardelli brand.


Bake in a 325 degree oven.  Bake until a cake tester inserted into brownies (avoid center and edges) comes out with a few crumbs but is not wet.  This will be about 45 minutes.  Take out of the oven and sprinkle with some chocolate chips (optional).  When chocolate is melted, spread with a spatula and the sprinkle with some chopped peanut butter cups. 


OMG you guys.  I mean.  I just can't even handle it.  These were nuts.  Pea-nuts.


Mmmm.


Ok here's the recipe!

2 Packages of Pre Made Chocolate Chip Cookie Dough
2 Boxes of Favorite Brownie Mix (plus oil, eggs, and water required by box) 
18 Peanut Butter Cups 
1/2 Cup Chocolate Chips 

Pre heat oven to 325. Press cookie dough into the bottom of a 9x13 pan. Place 12 of the peanut butter cups on the cookie dough, distributing evenly.  Make prepared brownie mix per the box instructions and pour over peanut butter cups.  Bake for about 45 minutes, or until tooth pick (or fork or knife) comes out with only a few crumbs.  Immediately sprinkle with chocolate chips.  When they start to melt, spread evenly with spatula.  Let cool for a few minutes and then add remaining peanut butter cups that have been chopped up.

Try these.  You'll make friends.  Stay hungry!

Wednesday, February 12, 2014

Valentine's Day Desserts

Okay, so it's no secret that I don't like baking.  I think I mention it like every other post.  I feel badly for Charlie sometimes.  Because if I do happen to make something or we do happen to order dessert after dinner, he really enjoys it.  I'm lazy, though, and baking requires thought and effort so too bad for him.  Happy Valentine's Day, sweetie!!!

Luckily, the world wide web has some amazing Valentine's Day dessert ideas so I thought I'd do a little research for you guys since I got nothin'.

1.  Blackberry Jam Bars from Bake-a-holic look simply amazing.  I'm thinking for Valentine's Day, you swap about the blackberry jam for either raspberry or strawberry preserves to make them extra Valentine Day dessert-ish.


2.  Red Velvet Cream Pies for Two from Living Better Together just look so cute.  I can't even handle it.


3.  Mini Red Velvet Cheesecakes from Sally's Baking Addiction look SO DELICIOUS.  What an awesome idea.


4.  Red Velvet Gooey Butter Chocolate Chip Cookies from Averie Cooks.  Whew that's a mouthful.  I just wish it was a mouthful of this dessert and not words.


5.  Red Velvel Molten Chocolate Cake from Half Baked Harvest.  What a SWEET idea.  I wish I had thought of it.  My mouth just drooled....a lot.  I just love how special and festive this Valentine's Day Dessert is.  So special!


Okay folks!  That's what I'v got.  What sweets are you going to make for your sweetie this year?

Stay hungry!

Monday, February 10, 2014

Valentine's Day Popcorn

This is probably the only Valentine's Day thing I'll make this year.  I'm seeing all sorts of stuff on Pinterest.  Handmade Valentine's Day wreaths, pencil toppers, heart crayons, and Rainbow Loom bracelets. "Ain't nobody got time for that," if you will.  Here's a quickie V-Day project - I made it this in less than twenty minutes this morning while Will was playing with his busy box and Jesse was watching the Olympics.  Then I ate some for breakfast.


This simple Valentine's Day popcorn just takes a few ingredients...

1/2 cup popcorn kernels
2 tablespoons coconut oil
1/2 cup m&ms
1/3 cup white chocolate chips
red sugar sprinkles
a pinch of salt

...and of course you can be flexible with the treats you add to the popcorn.  This would be tasty with all sorts of sweet things on top.

First I popped the popcorn kernels on the stove by heating up the coconut oil in a pot, testing a kernel or two, and then popping the rest once the oil was hot enough (shaking the whole time to avoid burning).  Once the popcorn was done, I spread it out in a thin layer on a cookie sheet and got to work melting the white chocolate in the microwave.  No photo of the process here because it all had to be done quickly - as soon as the white chocolate was melty and drippy, I drizzled it over the popcorn and while it was still melted, shook out some red sugar sprinkles and m&ms onto the popcorn.  Finally, I put just a tiny bit of salt across the popcorn since I love all things salty and sweet.


In the time it took to clean the popcorn pot and the chocolate bowl, everything was cooled down enough to stick into small bags (then quickly dispensed to neighbors and grandparents so I wouldn't eat it all).


Have a sweet Monday! 

Monday, October 7, 2013

Creative Halloween Desserts

Can you guys believe that Halloween is only a few weeks away?  I can't believe it.  Fall seems to move quicker than Summer.  Well...almost.  Anyway, here are a few of my favorite Halloween desserts that I stumbled upon.  I think these are SO creative and would make for a super fun Halloween dessert spread.  The witch finger cookies totally freak me out.

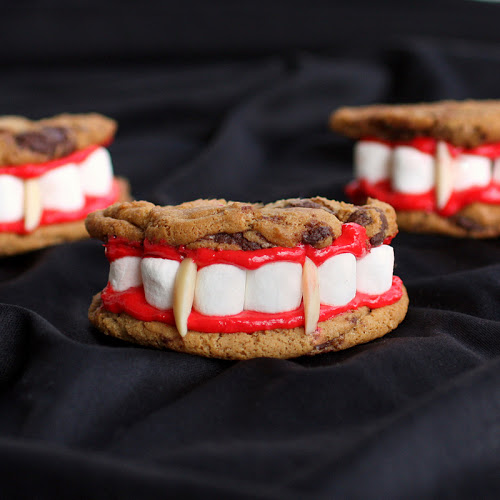
Dracula's Dentures by the Girl Who Ate Everything.


Creepy Chocolate Chip Cookies by Hungry Happenings.


Candy Corn Bundt Cake by A Baker's House.


Monster Cupcakes by Whipped.


Witch Finger Cookies by Sweetest Kitchen.

witchfingers

Stay Hungry!

Wednesday, September 4, 2013

Apple Recipes

I don't know what it is, but the second I get the slightest chill in the air, I start to think about apples.  Goodbye s'mores, goodbye BBQs, hello cozy fires and freshly picked apple pies.  I went on a little adventure and found the following drool to the face recipes.  I'll be trying some of these out soon.  HOLLA.

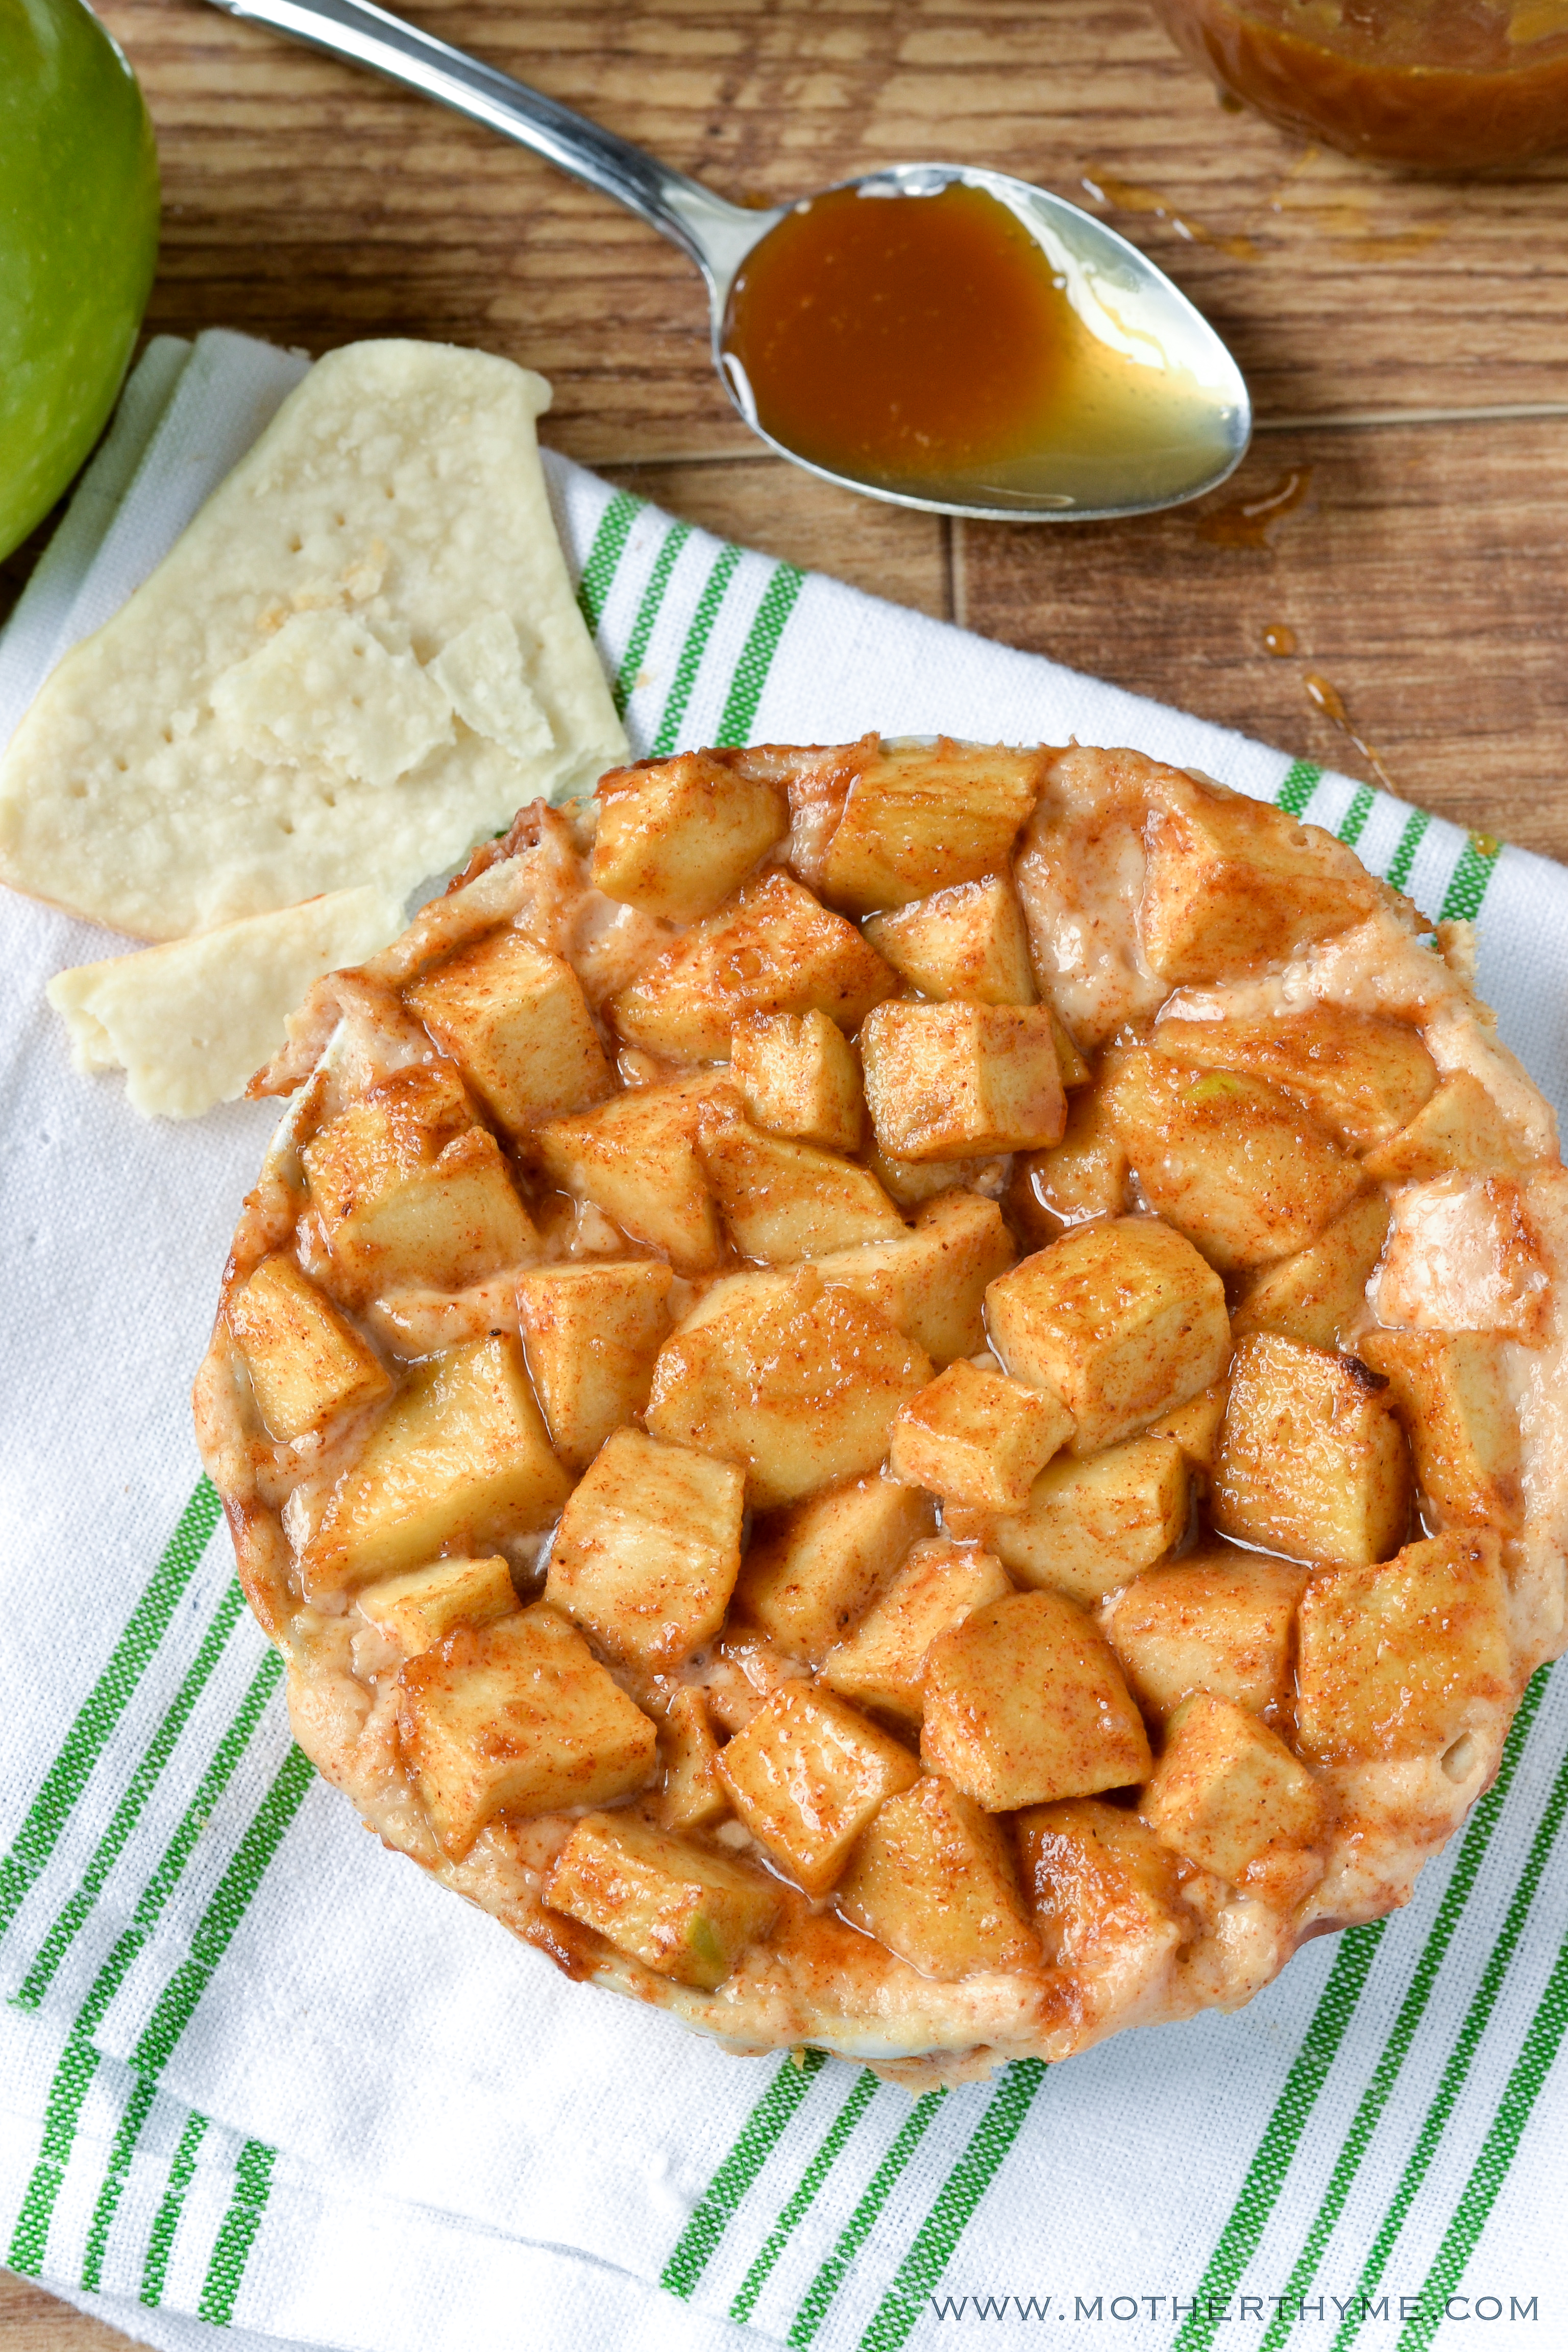
1.  Apple Pie Dip from Mother Thyme.  Looks SO yummy and is such a cool little fall dip. 


2.  Deep Fried Apple Pie Bites.  MMMMMM Kayyyyyy.  Be a little more delicious looking.


3. Caramel Cheesecake Apple Blondies.  I can get behind this.


4. Smoked Cheddar Grilled Cheese with Granny Smith Apple & Dijon Mustard.  DUDE.  You know I had to throw something cheesy in here. I literally can not look at this pic without drooling. Oh my Gouda.


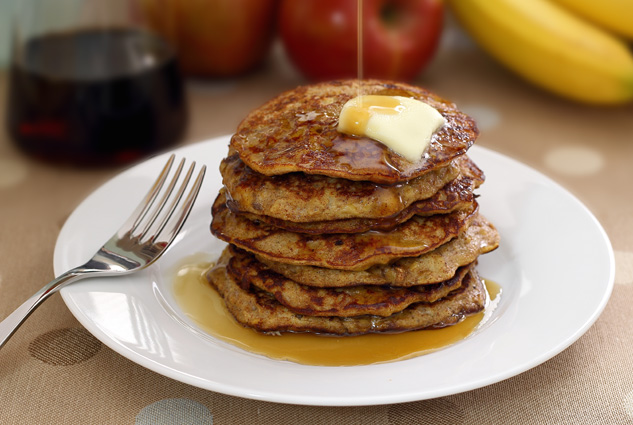
5. Paleo Apple Cinnamon Pancakes.  Just to round out our balanced diet, I thought I'd throw in a delicious looking paleo recipe too.

Paleo Apple-Cinnamon Pancakes Recipe

 Stay hungry!

Wednesday, August 28, 2013

Blueberry Cream Cheese Dessert

If you aren't sure what dessert you are going to make for your Labor Day festivities or ANY festivity for that matter MAKE THIS please.  This dessert is just hurting people up in here.


It's so good.  My Mom made this for me when I was home a couple of weeks ago and I had about fourteen servings. She also made it with fresh Maine blueberries.  It wasn't fair.  I didn't even have a fighting chance. 


Start by adding the water, half the sugar, cornstarch, and half the fresh blueberries and simmer until berries begin to burst, about 3-5 minutes. Continually stir over medium heat so the mixture doesn't burn.  Take off the heat, and add the rest of the blueberries.  Set aside and let the mixture cool for 45 minutes. 


Next, make the crust.  This crust is so good.  It's nutty and savory and yummy and so easy!  Flour, butter, and walnuts with a pinch of salt. Easy peasy.


Press the mixture into a 9 x 13 pan to form a crust.  Cook at 350 for 15-16 minutes then set aside to cool for 45 minutes. It will end up like this:


Beat your cream cheese with the powdered sugar, and then fold in the Cool Whip.


Spread the cream cheese mixture over the crust. 


Next, pour the blueberry mixture on top.


Mmmmmm....


Isn't this sooooo pretty?!  It also keeps like this for 2-3 days.  So if you need a dessert to serve over the weekend, this is the perfect thing to make.  It probably won't last though, but that's not my fault.  You just didn't make enough.


Oh..before I forget, top with some extra whipped cream.  DUH LISH.


Here's the recipe: 

Crust: 
2 Sticks of Unsalted Butter, Melted
2 Cups of Flour 
1 1/3 Cups of Finely Chopped Walnuts 
Pinch of Kosher Salt 

Cream Cheese Filling: 
8 Ounces of Cream Cheese, Room Temp 
1 Cup of Powdered Sugar 
8 Ounces of Cool Whip  

Blueberry Topping: 
2 Pints of Fresh Blueberries 
3 Tbs Cornstarch 
1 Cup of Sugar, separated 
1/4 Cup of Water 

Whipped Cream: 
3 Cups of Heavy Whipping Cream 
2-3 Tbs of Sugar 

Preheat oven to 350 degrees.  Mix crust ingredients and press into a 9 x 13 pan and bake for 15-16 minutes to set the crust.  Set aside to cool, about 45 minutes.  While crust is cooling, make cream cheese filling and blueberry topping.

To make the blueberry topping, add water, 1/2 cup of sugar, and cornstarch to a sauce pan and cook over medium heat until blended. Add 1 pint of blueberries to pan and simmer until berries begin to burst, stirring constantly for about 3-5 minutes.  Take off the heat, add remaining 1/2 cup of sugar and other pint of blueberries. Stir, set aside and cool for 45 minutes.    Beat cream cheese and powdered sugar until well blended.  Fold in Cool Whip. Spread cream cheese mixture over crust. Pour blueberry mixture over cream cheese.  Let set in fridge for 30 minutes before serving.  Add fresh, real whipped cream on top to make it extra special.

To make the fresh whipped cream for topping, beat heavy cream on medium until cream begins to thicken.  Add 2-3 tablespoons of sugar until it reaches desired sweetness. Continue to beat until stiff peaks form. Set aside.

Stay hungry!